Battery switch on travel trailer function is crucial for managing your RV’s power. Understanding how these switches work – whether it’s a simple 1-2-both-off or a more complex system – is key to avoiding electrical problems and maximizing battery life. This guide will walk you through everything you need to know, from safely connecting and disconnecting your batteries to troubleshooting common issues and performing essential maintenance.
We’ll cover different switch types, explore the electrical flow within the system, and provide practical advice for safe operation. Learn how to diagnose problems using a multimeter, prevent corrosion, and extend the life of your battery switch. We’ll also look at how your battery switch interacts with your charging system, whether it’s a converter, solar panels, or both, ensuring you get the most from your RV’s power setup.
Understanding Battery Switch Functionality in Travel Trailers
Your travel trailer’s battery switch is a crucial component for managing power, protecting your batteries, and ensuring efficient energy use. It allows you to easily disconnect your house batteries from the trailer’s electrical system, preventing accidental drain and extending battery life. Understanding how it works is key to maintaining your RV’s electrical system.
Battery Switch Types and Their Purpose
Battery switches in travel trailers primarily serve to isolate your house batteries (the batteries powering your lights, appliances, etc.) from the rest of the electrical system. This is important for preventing parasitic drain—a slow but steady discharge of your batteries even when the trailer isn’t in use—which can leave you with a dead battery when you’re ready to go camping.
Common types include 1-2-both-off switches and simpler 1-2-off switches. A 1-2-both-off switch allows you to select either battery 1, battery 2, both batteries, or completely disconnect both. A 1-2-off switch only allows selection of battery 1, battery 2, or off. The choice depends on your trailer’s setup; some have dual batteries for increased capacity.
Internal Workings of a Battery Switch
A typical battery switch is essentially a multi-position rotary switch with heavy-duty contacts. Inside, there are several sets of contacts that connect and disconnect based on the switch’s position. These contacts are robust enough to handle the relatively high current draw of the trailer’s electrical system. The switch uses a mechanical system to route the power flow from the batteries to the various circuits in your trailer.
The switch’s position determines which battery (or batteries) are connected to the load.
Electrical Flow Through a Battery Switch
The following table illustrates how the electrical flow changes depending on the switch position for a common 1-2-both-off battery switch.
| Switch Position | Electrical Flow Description |
|---|---|
| Off | All circuits are disconnected from the batteries; no power flows to the trailer’s electrical system. This prevents parasitic drain. |
| Battery 1 | Power flows from Battery 1 to the trailer’s electrical system. Battery 2 is completely isolated. |
| Battery 2 | Power flows from Battery 2 to the trailer’s electrical system. Battery 1 is completely isolated. |
| Both | Power flows from both Battery 1 and Battery 2 to the trailer’s electrical system, effectively combining their power capacity. This is usually done in parallel. |
Connecting and Disconnecting Batteries
Working with your RV’s battery system is crucial for maintaining power and ensuring a safe and enjoyable camping experience. Understanding how to properly connect and disconnect your batteries using the battery switch is a fundamental skill for every RVer. Improper handling can lead to dangerous situations, so careful attention to safety procedures is paramount.Connecting and disconnecting batteries involves manipulating the battery switch, a device that allows you to isolate or connect different battery banks.
This switch usually has multiple positions, enabling you to select which battery bank powers your RV’s systems, or to completely disconnect both.
Battery Connection and Disconnection Procedures
Before you begin any work on your RV’s electrical system, always remember safety first. This means wearing appropriate safety glasses to protect your eyes from potential battery acid splashes. Ensure adequate ventilation to prevent the buildup of potentially explosive hydrogen gas released by the batteries. Hydrogen gas is lighter than air, so good ventilation at the top of the battery compartment is especially important.
Okay, so you’re dealing with your travel trailer’s battery, right? Knowing how to use that battery switch is crucial. Check out this guide on the battery switch on travel trailer function for a clear explanation. It’ll walk you through everything from understanding its purpose to troubleshooting common problems. This is especially helpful if you’re new to RVing, or if you’ve ever wondered why your lights aren’t working.
Another great resource, if you prefer a different style of explanation, is this one on the battery switch on travel trailer function which provides a more visual approach to understanding the system. Seriously, understanding your battery switch is key to a smooth trip!
Never work on batteries near open flames or sparks. Also, be aware that battery acid is corrosive and can cause serious burns; handle with care and use appropriate gloves.Here’s a step-by-step guide for safely connecting and disconnecting your batteries using a typical battery switch:
- Identify your battery switch: Locate the battery switch, usually found near your batteries or inside a dedicated electrical compartment. Familiarize yourself with its markings and positions (e.g., “Off,” “Battery 1,” “Battery 2,” “Both”).
- Turn the switch to the “Off” position: This completely disconnects both batteries from your RV’s electrical system, preventing accidental short circuits or power surges.
- Connect or disconnect as needed: Once the switch is in the “Off” position, you can now safely connect or disconnect any individual batteries. If needed, carefully clean the battery terminals with a wire brush to remove any corrosion before connecting. Ensure all connections are secure and tight.
- Select the desired battery bank: Once you’ve made the necessary connections, use the switch to select the battery bank you wish to use (“Battery 1,” “Battery 2,” or “Both”).
Consequences of Improper Battery Switch Operation
Improper operation of the battery switch can result in several problems, some of them potentially serious. Connecting batteries incorrectly can lead to short circuits, potentially damaging your RV’s electrical system or even causing a fire. Leaving the switch in the wrong position can drain your batteries unexpectedly, leaving you without power when you need it. Furthermore, neglecting safety precautions when working with batteries can result in injury from battery acid burns or explosions due to the release of hydrogen gas.
Battery Switch Operation Flowchart, Battery switch on travel trailer function
[Imagine a flowchart here. The flowchart would visually represent the steps above. It would start with “Begin,” then show a box for “Turn switch to ‘Off’,” followed by boxes for “Connect/Disconnect batteries,” and “Select desired battery bank,” finally ending with “End.” Arrows would connect the boxes, indicating the flow of the procedure. The flowchart would ensure clarity and visual representation of the process.]
Troubleshooting Common Battery Switch Issues
Your travel trailer’s battery switch is a critical component, ensuring you can easily switch between your RV’s house batteries and your tow vehicle’s charging system. Problems with this switch can leave you with dead batteries and a frustrating camping experience. This section will guide you through identifying, diagnosing, and resolving common issues.
Identifying Common Battery Switch Problems
Common problems with battery switches often stem from environmental factors and general wear and tear. Corrosion is a frequent culprit, building up on the terminals and hindering the flow of electricity. Loose connections, either at the switch itself or the battery terminals, are another common cause of malfunctions. Finally, the switch itself can fail due to age or overuse, leading to an inability to select the correct power source.
Regular inspection and preventative maintenance can significantly reduce the likelihood of these problems.
Diagnosing a Faulty Battery Switch with a Multimeter
A multimeter is an invaluable tool for diagnosing battery switch issues. Before you begin, always disconnect the negative battery terminal to prevent accidental shocks. To check for corrosion, visually inspect the terminals and switch connections. If corrosion is present, clean them thoroughly with a wire brush and baking soda solution. Next, use your multimeter to check the voltage at the battery terminals and at the switch output.
If the voltage readings are significantly lower than expected (e.g., substantially less than 12V for a 12V system), this indicates a problem within the switch or its connections. You can also test continuity across the switch itself to confirm it’s internally sound. If the multimeter registers no continuity when the switch should be connected, it’s likely faulty.
Remember to always consult your multimeter’s instructions for proper usage.
Replacing a Damaged Battery Switch
Replacing a faulty battery switch is usually a straightforward process. First, disconnect the negative terminal of both batteries. Then, carefully remove any wires connected to the old switch, taking note of their positions for re-installation. Unscrew the old switch from its mounting location. Install the new switch, ensuring it’s securely fastened.
Okay, so you’re dealing with your travel trailer’s battery and need to understand the whole setup? Check out this super helpful guide on the battery switch on travel trailer function – it’s a lifesaver for avoiding dead batteries. Seriously, understanding how this switch works is key to keeping your lights and appliances running smoothly. Another great resource, if you need more details, is this one explaining the battery switch on travel trailer function in more depth.
Mastering this will make your camping trips so much easier!
Reconnect the wires, matching them to their original positions. Finally, reconnect the negative battery terminals and test the switch functionality to confirm everything works correctly. Remember to always consult your RV’s wiring diagram and your new switch’s instructions for specific installation details.
Troubleshooting Guide
| Problem | Cause | Solution |
|---|---|---|
| No power to house batteries | Corrosion on battery terminals or switch | Clean terminals and switch connections with a wire brush and baking soda solution. |
| Intermittent power to house batteries | Loose connections at the battery terminals or switch | Tighten all connections. |
| Switch does not function | Faulty battery switch | Replace the battery switch. |
| Low voltage readings | Internal switch failure or poor connections | Check all connections; if the problem persists, replace the switch. |
Battery Switch and Charging Systems
Understanding how your battery switch interacts with your RV’s charging system is crucial for maintaining your batteries and ensuring you have power when you need it. This section will detail the relationship between the battery switch and various charging sources, explaining how the switch impacts charging efficiency and the overall health of your batteries.The battery switch acts as a central control point, determining which batteries are connected to the charging system and which are connected to the house loads.
This control is essential because different charging systems have varying voltage and amperage outputs, and improper connections can damage your batteries. Furthermore, the type of battery you have (lead-acid or lithium) significantly impacts how it should be charged, and the battery switch plays a key role in ensuring the correct charging profile is applied.
Charging System Interaction
The charging system, typically comprising a converter (powered by shore power or generator), and potentially solar panels, sends power to the batteries through the battery switch. When the switch is in the “both” or “combined” position (if your switch has this option), both battery banks receive charging current. If the switch is in the “off” position, no charging occurs.
If it’s in the “battery 1” or “battery 2” position, only the selected bank receives charging current. This selective charging capability is especially important when using different battery types or managing the charge state of individual banks.
Charging Different Battery Types
Lead-acid batteries are more tolerant of overcharging than lithium batteries. While a lead-acid battery might simply produce more gas with overcharging (which isn’t ideal), lithium batteries are far more susceptible to damage from overcharging. A properly configured battery switch and charging system should allow for separate charging profiles based on the battery type. For example, the charging system might automatically adjust voltage and current based on the battery bank selected via the switch.
This ensures that lead-acid batteries receive a bulk charging phase followed by a float charge, while lithium batteries receive a more precise and controlled charging profile to prevent damage.
Single vs. Multiple Battery Charging
Charging a single battery is simpler. The charging system directly feeds the battery through the switch. However, with multiple batteries, the switch’s role becomes more critical. It allows the charging system to selectively charge individual banks, enabling balanced charging and preventing overcharging of one bank while another remains undercharged. This is particularly relevant when using different battery types or when one battery bank is significantly depleted.
The battery switch ensures that each battery bank receives the appropriate charging current based on its state of charge and type.
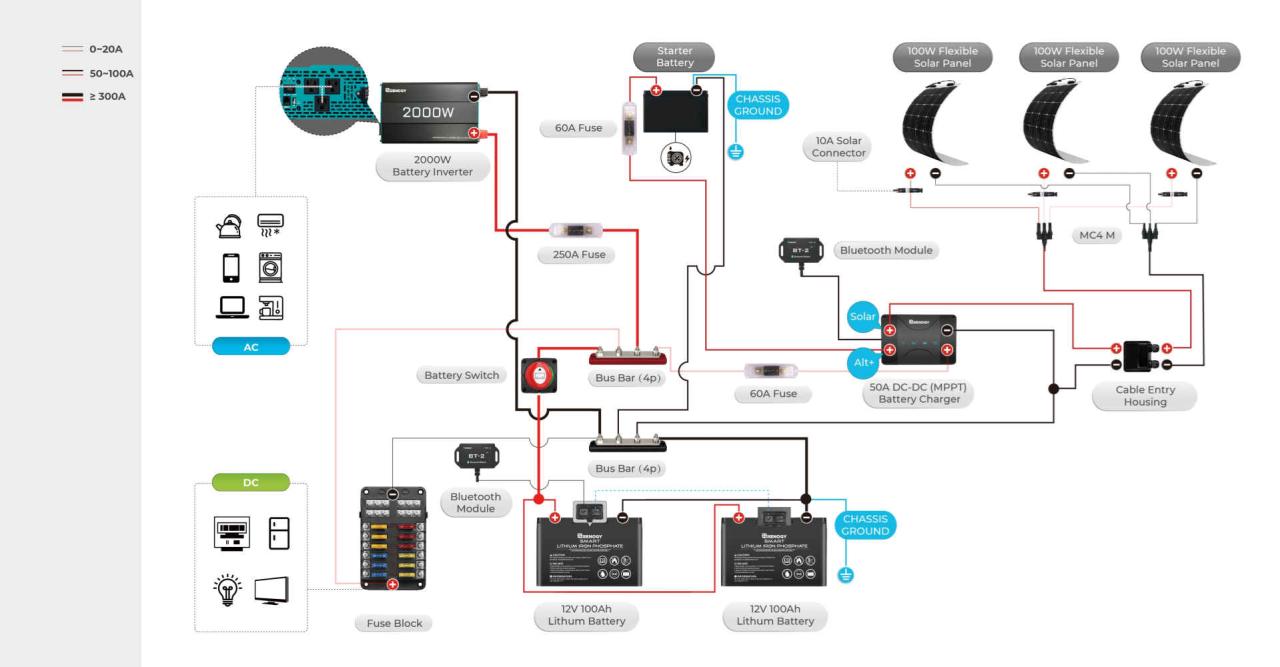
Electrical Connections Diagram
Imagine a diagram. At the top, we have the charging system, represented by a single box labeled “Converter/Solar Panels.” From this box, two wires extend downwards. One is labeled “Positive (+) Charge Line” and the other “Negative (-) Charge Line.” These lines lead to a rectangular box representing the “Battery Switch.” From the battery switch, two sets of positive and negative wires branch out.
Each set leads to a separate battery bank, labeled “House Battery Bank 1” and “House Battery Bank 2.” Each battery bank consists of one or more batteries connected in series or parallel, depending on your system’s configuration. Finally, from each battery bank, additional wires connect to the house loads (lights, appliances, etc.). The battery switch acts as the gatekeeper, controlling the flow of electricity from the charging system to the chosen battery bank.
Note that there are also ground connections (not shown explicitly in this simple description) that are crucial for safety and proper operation.
Mastering your travel trailer’s battery switch is about more than just flipping a switch; it’s about ensuring reliable power and extending the life of your valuable batteries. By understanding the different types of switches, following safe operating procedures, and performing regular maintenance, you can prevent costly repairs and enjoy worry-free adventures. This guide equips you with the knowledge to confidently manage your RV’s power system and keep your travels smooth and enjoyable.
Q&A: Battery Switch On Travel Trailer Function
What happens if I accidentally leave my battery switch in the wrong position?
Depending on the position, you might drain your batteries, prevent them from charging, or create a short circuit. Always double-check the switch position before leaving your RV.
How often should I clean my battery terminals?
Ideally, clean your battery terminals at least twice a year, or more often if you notice corrosion.
Can I use any type of battery with my travel trailer?
No, your RV’s charging system might not be compatible with all battery types. Check your owner’s manual for recommendations.
My battery switch feels stiff. Is that normal?
Some stiffness is normal, but excessive resistance could indicate a problem. Lubricating the switch mechanism might help, but if the problem persists, it’s best to have it checked.
